Today I was preparing a SharePoint 2013 demonstration for the conference Overheid & ICT 2014. This is a large conference within The Netherlands where all kinds of governments can see new innovations and possibilities on IT. For this conference we decided to go along with a whole bunch of solutions we‘ve created of the past few years. One of them where SharePoint project sites. In order to show some more information and to answer a question of a customer, who recently asked If we are able to provide map data on a SharePoint site I decided to display some data on a map as well. I thought this was going to be hard, however with SharePoint 2013 it turned out to be quite easy. Based on this blog, I was able to fix it within 20 minutes. Here is how I did it.
Requesting a Bing key
First of all, you need to request a Bing key. To request a key, navigate to the URL: http://www.bingmapsportal.com/. Using this website you are able to login, or create a new account using your Microsoft credentials. After registering, you are now able to generate key’s. The key is used as a authentication provider, when no key is provided a bar will be shown in the middle of your maps, stating that you are not authenticated. All of the information on Bing Maps will be entered using this key. I suggest you would use a company account to request the key
You are able to generate multiple key’s. So when you want to create something for another SharePoint farm, request a new key, in order to separate al of the Data flows. Especially when developing a commercial website, a lot of request can bring some additional costs.
Preparing SharePoint
When a new key is generated, please copy the key. The key now needs to be imported into SharePoint. This is done using PowerShell. In order to do this login to your SharePoint server, open a SharePoint Management Shell and enter the following command:
Set-SPBingMapsKey –BingKey “<Enter a valid Bing Maps key>”
When the key is imported a new column needs to be created. As we work mostly with site columns and content types, a little PowerShell Script can be used to create the column. The most interesting part, is that a certain field type, namely GeoLocation, is used. Apparently this is a default field type within SharePoint 2013 which can be used. In order to create such a column, use the following PowerShell command:
$weburl ="http://<website_address>"$fieldXml ="<Field Type ='Geolocation' DisplayName='GPS Location'/>"$web = Get-SPWeb $weburl$fieldName = $web.Fields.AddFieldAsXml($fieldXml)$web.Update()
When entering the correct URL the column will be created on that site. In order to change the name of the column change the term <GPS location>, and provide a name that is convenient for you.
The last thing is that this column needs to be added to a content type, and the content type needs to be added to a list. In that case you can use the column.
Entering data and displaying it in Views
After the column is created you can enter data. Normally the column is shown in two lines. However when you click “Specify location” a pop-up appears where the longitude and latitude can be entered, see figure below. Enter both the longitude and the latitude in the separate textboxes.
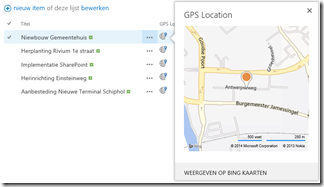
After entering the data and saving the item, the location is stored in the list which is being used. When the ‘GPS location’ column is added to the view a globe is shown in your view. When clicking the globe, it displays the location of the item. See figure below.
New View
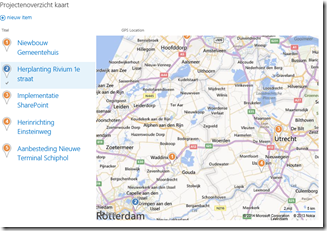
Using this type of column within a view, also offer you the possibility of creating a new type of view. When creating a new view it is possible to create a ‘Map view’. Within this view, a map is shown with pointers to items incorporated in the view. Whenever filters are applied, the items outside of the filter will not be shown. On the left side of the map, all items will be shown, when hovering an item, it will be shown in blue on the map. An example of the map view is shown below.
Conclusion
In the end using this kind of columns offer a whole lot new possibilities. The relative ease of use of this column, makes sure that it is incorporated in solutions easier and out of the box it provides already a lot possibilities. Using such a column I can see a lot of new possibilities appearing within SharePoint.


